

What's News
Since the G-WEB PLUS Facelift we have implemented even more changes and new features to improve your overall G-WEB experience. Check them out here:
Single Grid

The G-SWITCH and G-SPEAK grids in My Devices have been combined into a single grid so you can view and edit your devices from one place.
Easier Navigation

When you click on an icon in the My Devices grid it now opens a new page with the relevent information. There is a navigation bar at the top of the page so you can go between different aspects of the same device without having to go back to the My Devices page in between. Syncing, Device Info and Settings are no longer pop ups but have their own pages.
Health Check

Health Check is a diagnostic tool to help you troubleshoot any problems with your device. Simply click the Start Test button and a series of automated tests will be done. Icons will be displayed to show the test result. You can then click to see more information about the results and what steps to take if there is a problem.
SMS Commands
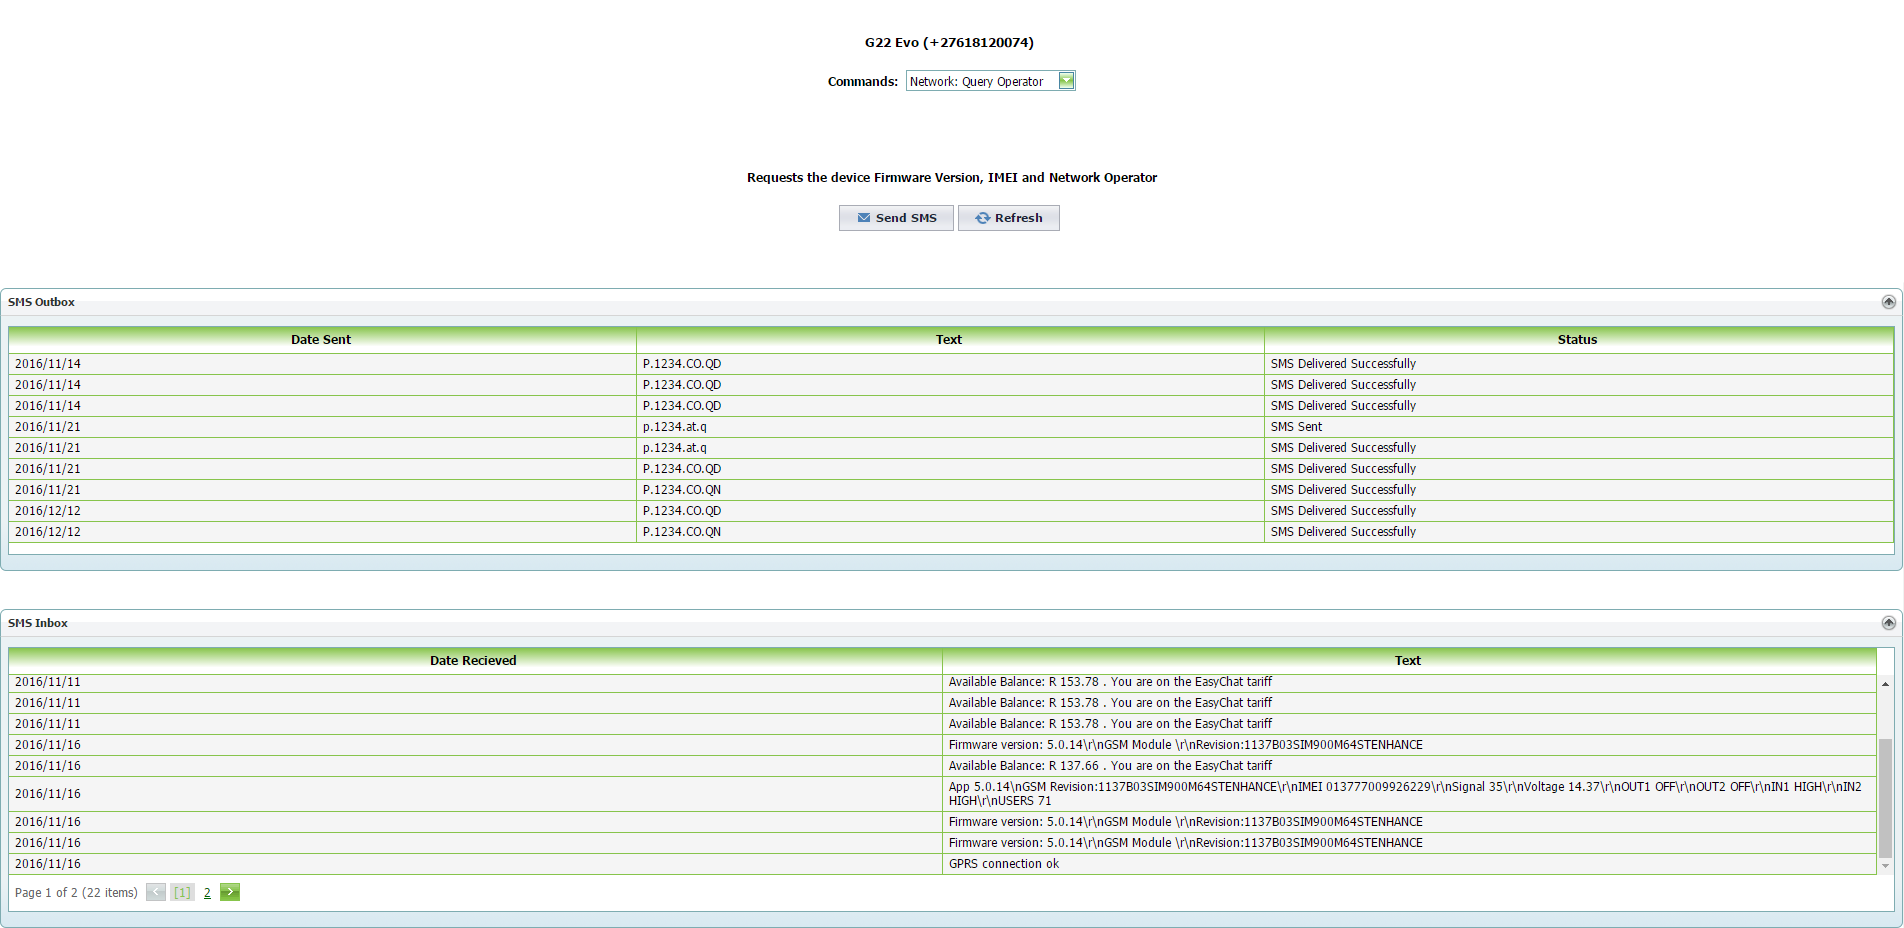
SMS Commands allow you to send a command directly to the device via SMS. You choose the command from a list and the SMS is automaically populated for you. There is an Outbox and Inbox so you can view the history of sent SMSs and replies. To view details about the commands select the command from the menu and read the description underneath.
What's News - Facelift
Welcome to G-WEB PLUS - the facelift! We have made some exciting new changes, let's take a look...
My Devices

The main page makes maintaining and viewing your devices even easier. Both G-Switches and G-Speaks are displayed here. Instead of clicking on Edit and then selecting which aspect you would like to view or change on your device, you can now click straight on the icon for Voice Numbers, Access/Switch Numbers, Logs, Device Info or Settings.
My Contacts

My Contacts is a brand new feature. It works a lot like the contact list on your phone, you can add a contact to your profile and then add it to devices. My Contacts is associated to your user profile and not per device. Add contacts one by one with the Add Contact button or add many at once by importing from Excel (you can also export to Excel). When you go to Voice, Access or Switch Numbers on a device, you will have the option to Add Number from Contact List where you can select contacts and add them, hassle-free. This page is also where you would edit your Custom Fields, read more about that below.
Custom Fields

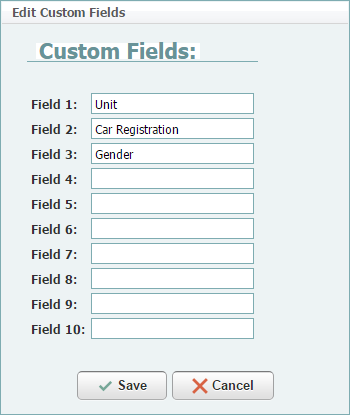
Custom Fields is a great new tool to make keeping track of Access and Switch Numbers on your devices even easier. Custom Fields are exactly like the Unit Number and Miscellaneous Text fields on the old site except now you can edit them to any name you like and have up to 10 fields. Click the My Contacts tab at the top of the page and then click Edit Custom Fields underneath the grid. Here you can type in the names of the fields. If empty the field will not be displayed but if you have typed in a name all your contacts and numbers displayed anywhere on the site will be followed by columns with the headings you have entered. When you add or edit a number you will be able to type into these fields and they will be displayed. If you delete a field and then re-add it, anything you typed in that field previously will have been saved and displayed.
Synchronising
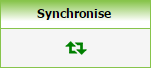
When you click the Sync icon a pop up will be displayed showing the sync process. When you click Sync Device the sync process will start. The icons and progress bar show in detail what part of the sync you are at and if each stage has been successful. Text beneath the progress bar displays more details of the sync stage.
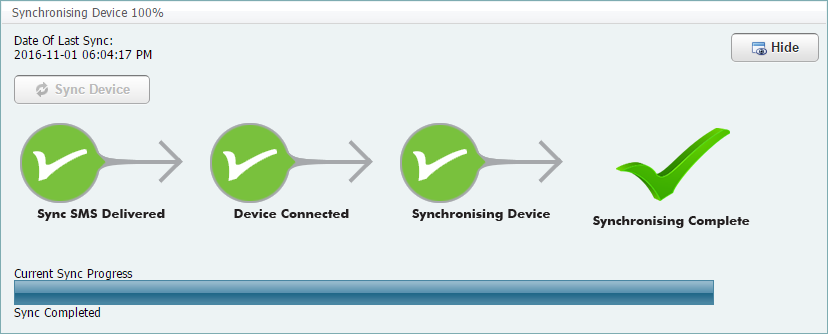
We are pleased to say that the sync process has been optimised and synchronisations should be faster. In addition, you can now sync multiple devices simultaneously with the Synchronise Selected button - more about that to follow.
Device Info
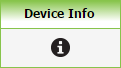
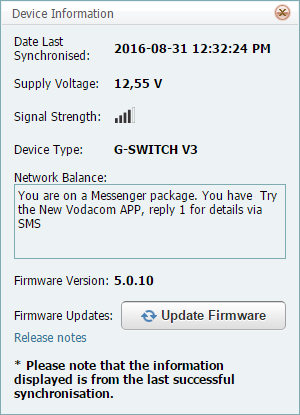
Click on the Device Info icon to see the following information all displayed in one pop up:
- Date and time of last sync
- Voltage
- Signal Strength
- Device hardware type
- Network balance
- Firmware version
This is also where you can update your device firmware if available by clicking the Update Firmware button. All information is accurate at time of last sync.
Voice Numbers
Click on the icon to view and edit Voice Numbers. You can add a Voice Number from a list of your Switch Numbers or My Contacts. You are now able to delete Voice Numbers without having to replace the number with another.
Switch Numbers
Click on the icon to go to the Switch Numbers page. Here you will see all your Switch Numbers displayed with Custom Fields. Add numbers individually by clicking Add Number or add multiple numbers using Add Number from Contact List or Import. Clicking the Edit icon opens a pop up where you can edit name, number, custom fields, suspended and input and output permissions. Delete numbers by clicking the Delete icon or selecting multiple numbers and clicking Delete Selected Numbers. Export your numbers in PDF, XLS or CSV format. Please note that you will have to download a new template in order for Upload to work on the new site.
Access Numbers
Click on the icon to go to the Access Numbers page. Here you will see all your Access Numbers displayed with Custom Fields. Add numbers individually by clicking Add Number or add multiple numbers using Add Number from Contact List or Import. Clicking the Edit icon opens a pop up where you can edit name, number, custom fields and suspended. Clicking the Permissions icon opens a pop up where you can edit Timed Access Control and input and output settings for the number. Delete numbers by clicking the Delete icon or selecting multiple numbers and clicking Delete Selected Numbers. Export your numbers in PDF, XLS or CSV format. Please note that you will have to download a new template in order for Upload to work on the new site.
Logs

Click on the icon to view the device's Logs page. This is where the logs will be displayed (including all Custom Fields for any logs involving numbers). Delete logs by selecting some and clicking Delete Selected or, if you prefer, Delete All. This page is where you would edit the setting to Upload Transaction Logs During Sync. Export your logs in PDF, XLS or CSV format. The option to Only Export Selected has now been added.
Settings
By clicking on the Settings icon a pop up will be opened where you can view and change General Settings (such as device name and password), Advanced Settings (such as mobile number and all pass mode) and IO Settings (such as input and output configurations). The only changes in Settings are as follows:
- PC Wins Contention is always set to on
- Upload Transaction Logs has been moved to the Logs page
- Sticky Latches has been renamed to Restore Output State On Power Up
- Input to Output Mapping has been renamed to Input Activates Output Mapping
- SMS Messages are on a separate tab
Transfer Device
Transfer a device to another user's account by clicking the Transfer Device icon. Type in the email address associated to the other user account and click Validate Email. You will then be prompted to click Request Transfer.
Secondary User
Secondary User is a brand new feature. You can "share" you device with another user. When you add a Secondary User (by clicking the icon) you will both have the device displayed on your accounts. You can choose whether the Secondary User can Read Only or Read and Modify Device. You need to validate the email of the user account in the same way as transferring a device. The Secondary User will have a column added on their My Devices page showing whether they are primary or secondary users on their devices. By clicking on the same icon, a Secondary User can remove the device from their profile and give up their part ownership.
Add New Device

Adding a new device is now simpler and faster with only two steps. Click on the Add New Device button and follow the prompts. The first window requires you to enter the name, password, country, network, number and time zone. Once you click Add Device the Password Verification and Synchronisation process will be displayed to you with detailed information on progress and where exactly the process might have failed.
Synchronise Selected

You can sync multiple devices at the same time by selecting the devices and then clicking Synchronise Selected. The pop ups will not be displayed unless you click the Sync icon in which case the sync process for that device will show. You can hide it again clicking Hide in the top right corner. Watch the Sync icon colours to easily see sync state:
- Red - waiting for device or sync failed
- Orange - busy synchronising
- Green - successful sync
Delete Selected Devices

Delete devices by selecting the devices and then clicking Delete Selected Devices. A pop up will show asking you to confirm your choice.
Clone Selected Device

This is a new feature where you can clone all the numbers and settings of one device onto another. Click the Clone tab on the left to see full details.
Sort, Filter, Group and Search
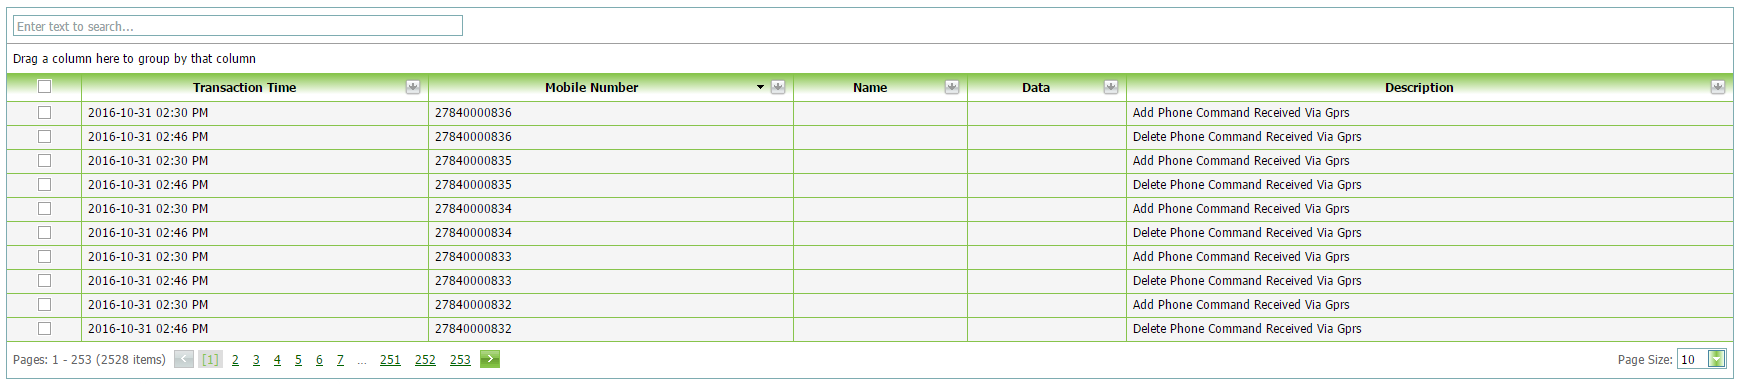
You can now Sort any grid by any column (which can be sorted in its nature). Just click on the column heading to sort by that column and click again to sort in descending order. For instance, sort your G-Switch devices by Device Name or sort Logs by Mobile Number (as seen in the image above).

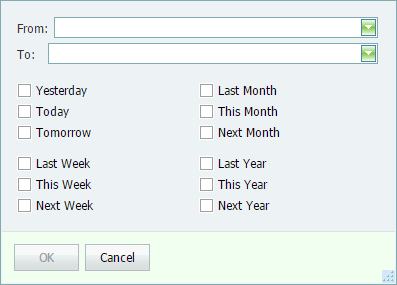
Filtering is a great tool you can use to Filter any grid by any column with a grey arrow in the heading. Click on the arrow and select a filter (in the image above, Logs were filtered for all logs with the description "Gprs Connection Timed Out"). The filter will change for date and time columns, as seen in the image below, so you can choose a predetermined option or specify your own range.
Remove a filter by clicking on the arrow again and selecting "All". Once you have applied one filter you can easily apply another filter on a different column, effectively filtering twice (or more), making this a very powerful tool.
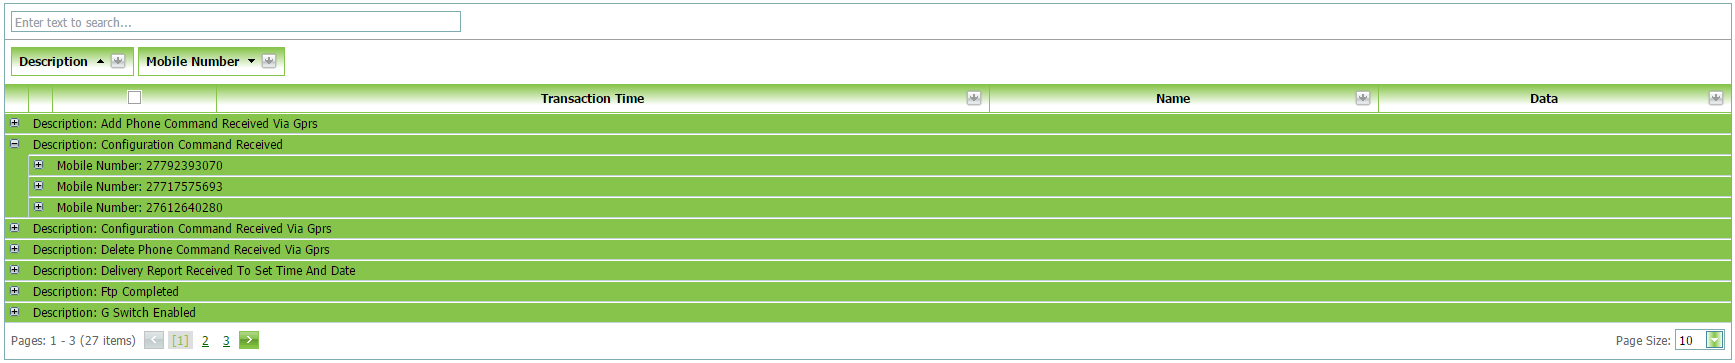
Group your grid into items by dragging the column name under the search box. In the image above Logs has been grouped first by Description and then by Mobile Number. You can see that each different description has been grouped and then within that grouping (which you can expand by clicking the + sign or collapse by clicking the - sign) there is a further grouping according to number. Whichever column you drag first will be the prioritised grouping. You can drag a column back onto the grid to remove that grouping. This is a convenient place to mention that you can Drag and Swap around the order of the columns for any grid by clicking and dragging the column headings. This makes the grids truly customisable.
Searching works the same as before but has been optimised to get results faster.